In this section, we are going to develop our first MapReduce Application. We will see the class structure of a MapReduce application then we will create a MapReduce application in java using Eclipse IDE and finally we will execute our application using the command line. So, we are going to learn the following concepts:
- MapReduce Class Structure
- Create and Configure Java Project
- Run Using Command Line and Eclipse
When we talk about a Hadoop job, we mean a set of Map and Reduce classes. As a minimum, a Hadoop job class is a standard Java runnable class which need to contain a public static void main() method. In this method, we need to create an instance of
org.apache.hadoop.mapreduce.Job
object and we need to call the submit() method of this object.
import org.apache.hadoop.mapreduce.Job;
public class MyJobClass{
    public static void main(String[] args){

    Job job = Job.getInstance();
    //Configure the job object
    job.submit();

    }
}
For the configuration of the job object, we need to do at least these three: where to find map() method, where to find reduce() method and set of configuration parameters needed to apply the job such as which data is being used and what is the format of that data. We can set many more configuration parameters that we will see in the subsequent chapters. But these are the minimum requirements:
- Where the map method can be found.
- Where the reduce method can be found.
- Configuration parameters
The map() and reduce() methods need to live in their own classes so the Job Class/Master Class tells Hadoop which is the class containing the map() method and which is the class containing the reduce() method.
//Map Class
import org.apache.hadoop.mapreduce.Mapper;
public class MyMapClass extends Mapper{
    public void map(params){
    //Map code

    }
}
//Reduce Class
import org.apache.hadoop.mapreduce.Reducer;
public class MyReduceClass extends Reducer{
    public void reduce(params){
    //reduce code here

    }
}
Thus for a Hadoop job, we need a minimum of three classes: an overall Job Controlled Class, a Map Class and a Reduce Class. For a class to be a Map Class it must extend the
Mapper
class of
org.apache.hadoop.mapreduce
package and similarly for a class to be a Reducer class it must extend the
Reducer
class of
org.apache.hadoop.mapreduce
package. These above are the simplified version of Map, Reduce and Job classes you will see the full version of these classes below in this section.
When we put together these classes, the final Job class structure will look like the following:
import org.apache.hadoop.mapreduce.Job;
import org.apache.hadoop.mapreduce.Mapper;
import org.apache.hadoop.mapreduce.Reducer;

public class MyJobClass{ //Job Class
    //Map Class
    public static class MyMapClass extends Mapper{
        public void map(params){
        //Map code

        }
    }
    //Reduce Class
    public static class MyReduceClass extends Reducer{
        public void reduce(params){
        //reduce code here

        }
    }
    //main method for configuration parameters
    public static void main(String[] args){
        Job job = Job.getInstance();
        //Configure the job object
        job.submit();

    }
}
In Java, we can put several classes inside a public non-static class but the inner classed must be of the static type. The reason behind this structure is that when you compile and create the JAR file of your job, all the necessary classes will be created inside a single JAR file. Furthermore, you can directly reuse the MyMapClasse and MyReduceClass with several job objects in the main method. You can also go with the structure having the separate class each for the main(), map() and reduce(). We will see both the structure as when required in this course.
As I have told earlier the classes discussed above containing the simplified version of the code. Now let’s create real code for our first MapReduce Application. Every MapReduce application will have the similar structure so rather than creating structure from scratch for every application I have created a most basic Hadoop MapReduce template for now which you can reuse it for the development of basic MapReduce applications. Later in the course, I will introduce the more advanced version of this template when it required.
So the first thing you need to do is to set up a new project in Eclipse and configure it as Hadoop project. Every time you are going to create a new Hadoop project you need to follow these step:
- Switch to Eclipse and create a new Java Project with all the default options there and name it as FirstHadoopApp. You can take help from the screenshot given below:

- We need to import a large number of Hadoop libraries (jar files) into our project and these can be found in the following repository of the Hadoop installation directory:
$HADOOP_PREFIX/share/hadoop
- commn
- common/lib
- mapreduce
- yarn
Although we don’t need all the jar files in all the MapReduce projects but rather than selecting the required JAR files we will import all the JAR files in each project. Remember you need to import only the JAR files from only these four subdirectories. So add those JAR files to build path for your project. To do this, Right Click on your project, select
Build Path
then
Configure Build Path
, go to the
Libraries
tab and then go with the
Add External JARs
option. Now you need to navigate through the Hadoop installation directory to add all the JARs. You can take help from the screenshots given below:
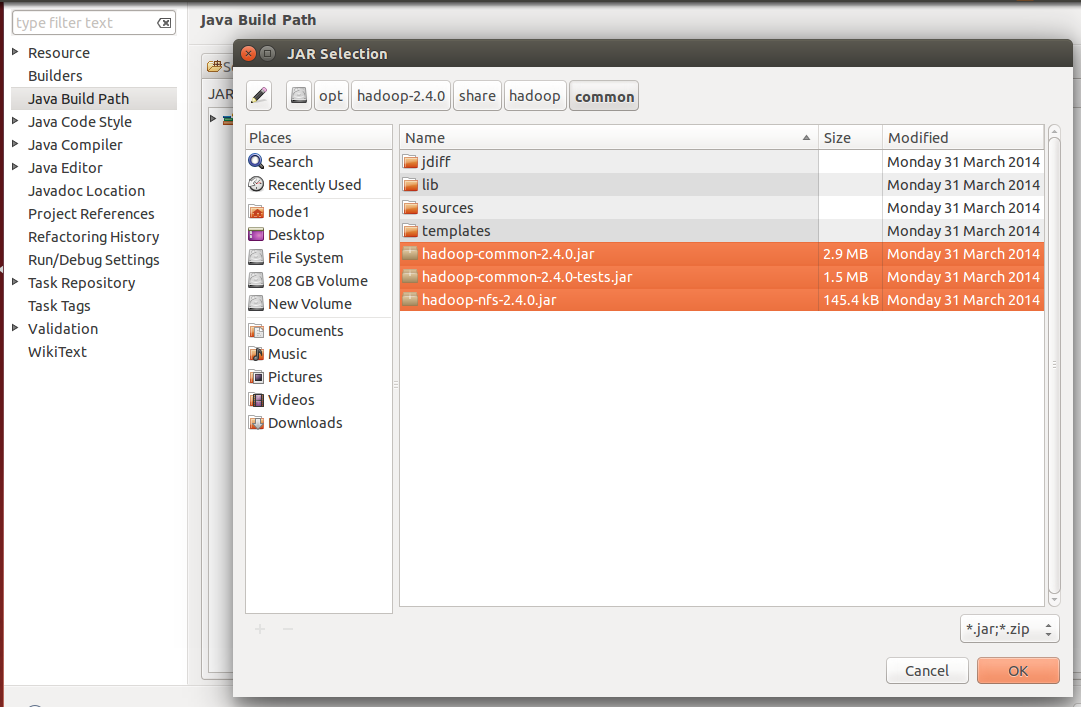
Figure 1: Importing from $HADOOP_PREFIX/share/hadoop/common

Figure 2: Improting from $HADOOP_PREFIX/share/hadoop/common/lib

Figure 3: Improting from $HADOOP_PREFIX/share/hadoop/mapreduce
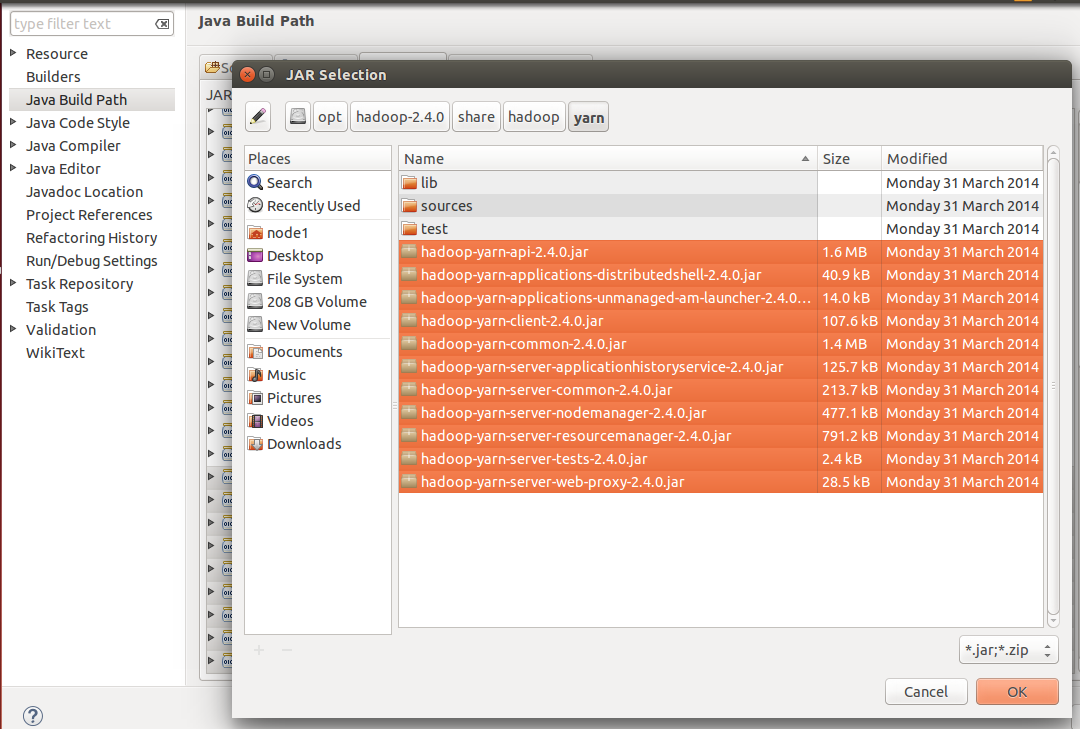
Figure 4: Improting from $HADOOP_PREFIX/share/hadoop/yarn
- Create a class named WordCountApp in your project, erase the default code generated for the WordCountApp from the code section then copy and paste the code from generic-template-1 given below and save it:
GenericMapReduceTemplate-Version1
//A generic-template-version-1 for MapReduce Program.

import java.io.IOException;
import java.util.Iterator;

import org.apache.hadoop.conf.Configuration;
import org.apache.hadoop.fs.Path;
import org.apache.hadoop.io.Text;
import org.apache.hadoop.mapreduce.Job;
import org.apache.hadoop.mapreduce.Mapper;
import org.apache.hadoop.mapreduce.Reducer;
import org.apache.hadoop.mapreduce.lib.input.FileInputFormat;
import org.apache.hadoop.mapreduce.lib.input.TextInputFormat;
import org.apache.hadoop.mapreduce.lib.output.FileOutputFormat;
import org.apache.hadoop.mapreduce.lib.output.TextOutputFormat;

    public class GenericMapReduce {
        public static class MyMapClass extends Mapper<Text, Text, Text, Text> {
            public void map(Text key, Text value, Context context)
                throws IOException, InterruptedException {
            //Do the map-side processing i.e., write out key and value pairs
                context.write(new Text(""), new Text(""));
            }
        }

        public static class MyReduceClass extends Reducer<Text, Text, Text, Text> {
            public void reduce(Text key, Iterable<Text> values,
                Context context) throws IOException, InterruptedException {
                //Do the reduce-side processing i.e., write out the key and value pairs
                Iterator<Text> it = values.iterator();
                while(it.hasNext()){
                    //Do some calculation
                }
                context.write(new Text(""), new Text(""));
            }
        }

        public static void main(String[] args) throws Exception {

        /**Configure the job**/
            Path in = new Path(args[0]);                //Create Path variable for input data
            Path out = new Path(args[1]);                //Create Path variable for output data

            Configuration conf = new Configuration();    //Create a token of Configuration
            Job job = Job.getInstance(conf);            //Create an instance of Job class using the getInstance()

            job.setOutputKeyClass(Text.class);            //Set the "key" output class for the map and reduce methods
            job.setOutputValueClass(Text.class);        //Set the "value" output class for the map and reduce methods

            job.setMapperClass(MyMapClass.class);                 //Set the Mapper Class
            job.setReducerClass(MyReduceClass.class);            //Set the Reducer Class
            //job.setCombinerClass(MyReduceClass.class);        //Set the Combiner Class if applicable.

            job.setInputFormatClass(TextInputFormat.class);            //Set the InputFormat Class
            job.setOutputFormatClass(TextOutputFormat.class);        //Set the OutputFormat Class

            FileInputFormat.addInputPath(job, new Path(args[0]));    //Specify the InputPath to the Job to read input data
            FileOutputFormat.setOutputPath(job, new Path(args[1]));    //Specify the OutputPath to the Job to write output data

            job.setJarByClass(GenericMapReduce.class);     //set the JobControl class name in the JAR file
            job.setJobName("MyJob");                     //set a name for you job

            job.submit();                                 //submit your job to Hadoop for execution


        }
    }
Likewise, a java application, the structure of this template comprises:
At the top there are some import statements to import Hadoop related libraries, then the main class definitions begin. Inside the main class, there are two static classes: the Map class and the Reduce class. Then the main() method, in which we configure our job, and finally we call the submit () method to run our job.
- Here you need to make some changes to this template in the Eclipse IDE to configure your application:
- First, change the main class name from GenericMapReduce to WordCountApp
- Second, in the setJarByClass() method pass the argument as WordCountApp.class.
Map Class
Now let’s discuss in details about the Map Class and map() method:
public static class MyMapClass extends Mapper<Text, Text, Text, Text> {
    public void map(Text key, Text value, Context context)
                throws IOException, InterruptedException {
            //Do the map-side processing i.e., write out key and value pair
                context.write(new Text(""), new Text(""));
            }
        }
Map class extends the Mapper class and in the definition,
MyMapClass extends Mapper< Text, Text, Text, Text >
, we need to provide four datatypes : two datatypes of Input Key and Input Values to Mapper and other two datatypes for Output Key and Output Value from the Mapper and in the template they are: Text, Text, Text, Text. Which means the Mapper of the generic example takes input key, values pair as Text, Text and it outputs key, value pairs as Text, Text as well. Here this Text datatype is Hadoop datatype which is pretty much equivalent to String datatype in Java. We will learn about the Hadoop datatype in a separate tutorial.
In short, the four datatypes present the key and value of input data and key and value of output data. So in this generic example, we said as Text key and Text value as our input to the map and we are going to output from our map as Text key and Text value.
The map() method:
map(Text key, Text value, Context context)
again takes a key and a value for input data with that datatype, in this example which are Text, and the Context object which is the data collector for the output. We write the records using the write() method on context object to specify our output key and output value. The total number of map() methods depends on the total number of records available in the input file i.e., one map() method will be executed per record.
Map Task of WordCount
Now let’s come to Map task of our WordCount Example. Here I am going to use a very small file, demofile.txt, as input to our program. But you can run this application on very bigger dataset it will work properly.
demofile.txt
he is liar or he is not liar
When this file provided to our application as input, the content of the file would convert in key and value pair by Hadoop and this key, value pair pass to the map() method to process. Here, in the below diagram, 1 represents the byte offset from the starting of the file provided by the Hadoop on the basis of the InputFormat, which is TextInputFormat by default, we will use in the job configuration. We will discuss the different Input Format used in Hadoop later in the course. For now, just understand one point: “because of the TextInputFormat, Hadoop supplies key as a byte offset to the Mapper and value as the line of the file terminated with newline character i.e., \n “.
Let’s suppose this demofile.txt having the multiple lines as:
he is liar or he is not liar
she is fair or she is not fair
In such cases, Hadoop provides byte offset as key and line terminated by a new line character as value:
| Key | Value |
|---|---|
| 1 | he is liar or he is not liar |
| 30 | she is liar or she is not liar |
Byte Offset Calculation: For the first line it started with 1 and for the next lines is the sum of “total character of the previous line including the white spaces and newline character” and “one”. For example, here for the second record of the file Byte Offset is calculated as 29 + 1 = 30.
Here, datatype for input key can either be IntWritable or LongWritable but I am going to use LongWritable because it going to cover a larger range of byte offset compare to IntWritable and hence this application can process a very big amount of data. Here we won’t give much care to the input key, we will only consider the input value part which is going to be Text type. So the input key, value datatypes for the Mapper are going to be LongWritable and Text. IntWritable and LongWritable are the Hadoop datatypes which are very similar to Integer and Long types of Java. We will discuss all the Hadoop datatypes in a separate section in this course.
So in Map task, map() method supposed to tokenize the input value and produce output key, value pairs like this:
| Key | Value |
|---|---|
| he | 1 |
| is | 1 |
| liar | 1 |
| he | 1 |
| is | 1 |
| not | 1 |
| liar | 1 |
So we can use Text and LongWritable datatypes for Output Key and Output Value from the Mapper. So our map() method would be:
public static class MyMapClass extends Mapper<LongWritable, Text, Text, LongWritable> {
    public void map(LongWritable key, Text value, Context context)
                throws IOException, InterruptedException {
            //Do the map-side processing i.e., write out key and value pairs

                context.write(new Text(""), new LongWritable(""));
            }
        }
Obviously, for this LongWritable you would need to import it as
org.apache.hadoop.io.LongWritable
. So our map() method taking input key as LongWritable and input value as Text and it’s writing out an empty Text key and empty a LongWritable value using the write() method on the context object.
Now lets come to the processing logic of map() method:
//Do the map-side processing i.e., write out key and value pairs
        1. String line = values.toString();
        2. String body = line.replaceAll("\\p{Punct}","").toLowerCase();
        3. String[] words = body.split(" ");
        4. for(String word: words)
                context.write(new Text(word), new LongWritable(1));
At the first step, it is going to convert the Text value of Hadoop into String of Java because we have a rich set of methods in String Class and we can use those methods to filter out the text. At the second step, it is going to remove all the punctuations and place the text in lower case. At the third step, it is going to split out the value using a whitespace and store them in a String array. At the last step, we will loop through the array and for every word in the array, write out the word as key and a LongWritable 1 as value. So let’s put all these statements in the map method, here I have changed the name of Mapper class as WordCountMapper, and it would look like this:
//Complete Map Class for WordCount
public static class WordCountMapper extends Mapper<LongWritable, Text, Text, LongWritable> {
    public void map(LongWritable key, Text value, Context context)
                throws IOException, InterruptedException {
            //Do the map-side processing i.e., write out key and value pairs

            String line = value.toString();
            String body = line.replaceAll("\\p{Punct}","").toLowerCase();
            String[] words = body.split(" ");
            for(String word: words){
                    context.write(new Text(word), new LongWritable(1));
            }
        }
    }
Reduce Class
Now let’s discuss in details about the Reduce Class and reduce() method:
public static class MyReduceClass extends Reducer<Text, Text, Text, Text> {
            public void reduce(Text key, Iterable<Text> values,
                Context context) throws IOException, InterruptedException {
                //Do the reduce-side processing i.e., write out the key and value pairs
                Iterator<Text> it = values.iterator();
                while(it.hasNext()){
                    //Do some calculation
                }
                context.write(new Text(""), new Text(""));
            }
        }
Reduce class extends the Reducer class and in the definition,
MyReduceClass extends Reducer< Text, Text, Text, Text >
, we need to provide four datatypes: two datatypes of Input Key and Input Values to Reducer and other two datatypes for Output Key and Output Value from the Reducer and in the template they are: Text, Text, Text, Text. Which means the Reducer of the generic example takes input key, values pair as Text, Text and it outputs key, value pairs as Text, Text as well.
The reduce() method:
reduce(Text key, Iterable< Text > values, Context context)
takes a key and an Iterable list of values for the key as input data with this datatype. Here the input key, value type to reduce() method must be same as output key, value type of Mapper, in this example which are Text, and the Context object which is the data collector for the output. We write the records using the write() method on context object to specify our output key and output value. The total number of reduce() methods depends on the total number of keys supplied as the input to it. More precisely for every key and iterable list of values, reduce() method would be executed once.
Reduce Task of WordCount
The input data to Reducer is going to be output data from the Mapper. The output data from Map look like the table given below: we have the list of strings which are the Keys and the Values which all are going to be 1. Here we also have some duplicates like: he, is and liar appeared a couple of times.
| Key | Value |
|---|---|
| he | 1 |
| is | 1 |
| liar | 1 |
| he | 1 |
| is | 1 |
| not | 1 |
| liar | 1 |
Now, what Hadoop does, before it takes the Map output and passes this output as input data to Reducer, an extra step known as Shuffle. We will learn about the Shuffle step in details later in the course. Here all we need to know is the purpose of Shuffle step is to rearrange the data. We need not code anything about Shuffle step, it happens automatically by Hadoop Framework. So Hadoop groups together this information so we only have each key once and the values are now going to be a list of all the values exist for that key. So the input to our Reduce task will look like this:
| Key | Value |
|---|---|
| he | [1 ,1] |
| is | [1,1] |
| liar | [1,1] |
| not | [1] |
| liar | [1] |
So, input to our Reduce task is set of keys as Text and the value is the lists of LongWritable. In reduce() method we will receive input value as an Iterable list of LongWritable as Iterable< LongWritable > provided by Hadoop and it will be easy to iterate through the list. The output from our Reduce Task is set of keys as Text and set of value as LongWritable.
| Key | Value |
|---|---|
| he | 2 |
| is | 2 |
| liar | 2 |
| not | 1 |
| liar | 1 |
Based on this information let’s code our reduce() method.
//Complete Reduce Class for WordCount
public static class MyReduceClass extends Reducer<Text, LongWritable, Text, LongWritable> {
    public void reduce(Text key, Iterable<LongWritablet> values,
                Context context) throws IOException, InterruptedException {
                //Do the reduce-side processing i.e., write out the key and value pairs
                Iterator<LongWritable> it = values.iterator();
                Long sum = 0l;
                while(it.hasNext()){
                    sum += it.next().get();
                }
                context.write(key, new LongWritable(sum));
            }
        }
We are looping through an iterable list of LongWritable and for each element in the Iterable list we are retrieving out its Long value using get() method and summing them up in the sum variable. So at the end of the loop, we will have the sum of all the values of the list for a particular key. Finally, we writing our key as Text which is the same as the input and sum as the new LongWritable value.
Job Configuration of WordCount
Now let’s look at the main() method. When we execute a Hadoop job, we are going to pass some command line arguments which are the input data to our job and the output data from our job. So first thing in our main method we do is to retrieve the input data and output data arguments and create a new object from them. These are Hadoop Path objects which allows Hadoop to read from and write to the relevant places on either HDFS or Local Drive based on what are the configuration is.
    Path in = new Path(args[0]);
    Path out = new Path(args[1]);
The next line creates a token of configuration. This statements actually loads in the current Hadoop configuration. So calling this line we tell Hadoop use whatever the configuration files say.
Configuration conf = new Configuration();
Next, we have created an instance of our Hadoop job. Then we need to tell Hadoop what is the output data from our Map and Reduce classes will look like. The lines of code here assume that both the map() and reduce() methods output in the same format which is by default as Text.
    Job job = Job.getInstance(conf);

    job.setOutputKeyClass(Text.class);
    job.setOutputValueClass(Text.class);
In our WordCount example, we are going to output value from both the map() and reduce() methods as LongWritable so we need to make a change in the main method as:
job.setOutputValueClass(LongWritable.class);
Now we need to tell Hadoop where to find the Map and Reduce classes. Remember when we call Hadoop we only tell on the command line using the main class, here for this example it is WordCountApp. This WordCountApp creates a job and this job tells the Hadoop where is the Map class and where is the Reduce class.
    job.setMapperClass(MyMapClass.class);
    job.setReducerClass(MyReduceClass.class);
For our WordCountApp, we have named our Map Class as: WordCountMapper and Reduce Class as: WordCountReducer. So we need to change these statements as:
    job.setMapperClass(WordCountMapper.class);
    job.setReducerClass(WordCountReducer.class);
Then we specify the format of input and output data. Here we have used Tex for both the input format and output format. We will see the other formats later in the course.
    job.setInputFormatClass(TextInputFormat.class);
    job.setOutputFormatClass(TextOutputFormat.class);
Then we tell Hadoop where the input and output data is using the Path variables we have created at the beginning of the main method.
    FileInputFormat.addInputPath(job, in);
    FileOutputFormat.setOutputPath(job, out);
We can also tell Hadoop where the input and output data, without creating Path variables at the beginning of the main method, using this way:
    FileInputFormat.addInputPath(job, new Path(args[0]));
    FileOutputFormat.setOutputPath(job, new Path(args[1]));
Then we need to tell the Hadoop what will the Job Control class name once we create the JAR file of our overall project.
job.setJarByClass(WordCountApp.class);
Then we can set a name for our job and this is optional step to put in our job configuration.
job.setJobName("WordCount");
Finally we call submit() method to submit our job to Hadoop and then Hadoop starts execution of the job.
job.submit();
So that’s all we need to run our first Hadoop Application.
The Full code in the Eclipse should be:
/**
 * A MapReduce WordCount Program in Hadoop using new API
 */

import java.io.IOException;
import java.util.Iterator;

import org.apache.hadoop.conf.Configuration;
import org.apache.hadoop.fs.Path;
import org.apache.hadoop.io.LongWritable;
import org.apache.hadoop.io.Text;
import org.apache.hadoop.mapreduce.Job;
import org.apache.hadoop.mapreduce.Mapper;
import org.apache.hadoop.mapreduce.Reducer;
import org.apache.hadoop.mapreduce.lib.input.FileInputFormat;
import org.apache.hadoop.mapreduce.lib.input.TextInputFormat;
import org.apache.hadoop.mapreduce.lib.output.FileOutputFormat;
import org.apache.hadoop.mapreduce.lib.output.TextOutputFormat;

/**
 * @author Dv Analytics.com
 *
 */

public class WordCountApp {
        public static class WordCountMapper extends Mapper<LongWritable, Text, Text, LongWritable> {
            public void map(LongWritable key, Text value, Context context)
                throws IOException, InterruptedException {
            //Do the map-side processing i.e., write out key and value pairs
                String line = value.toString();
                String body = line.replaceAll("\\p{Punct}","").toLowerCase();
                String[] words = body.split(" ");
                for(String word : words){
                    context.write(new Text(word), new LongWritable(1));
                }
            }
        }

        public static class WordCountReducer extends Reducer<Text, LongWritable, Text, LongWritable> {
            public void reduce(Text key, Iterable<LongWritable> values,
                Context context) throws IOException, InterruptedException {
                //Do the reduce-side processing i.e., write out the key and value pairs
                // here Reducer receives key, value pairs as: word, [1,1,1,...,1]
                Iterator<LongWritable> it = values.iterator();
                Long sum = 0l;
                while(it.hasNext()){
                    sum += it.next().get();
                }
                context.write(key, new LongWritable(sum));
            }
        }

        public static void main(String[] args) throws Exception {

            /**Configure the job**/
            Path in = new Path(args[0]);            //Create Path variable for input data
            Path out = new Path(args[1]);            //Create Path variable for output data


            Configuration conf = new Configuration();            //Create an instance Configuration Class
            Job job = Job.getInstance(conf);                    //Create an instance of Job class using the getInstance()

            job.setOutputKeyClass(Text.class);                    //Set the "key" output class for the map
            job.setOutputValueClass(LongWritable.class);        //Set the "value" output class for the map

            job.setMapperClass(WordCountMapper.class);             //Set the Mapper Class
            job.setReducerClass(WordCountReducer.class);        //Set the Reducer Class
            //job.setCombinerClass(MyReduceClass.class);        //Set the Combiner Class if applicable.

            job.setInputFormatClass(TextInputFormat.class);        //Set the InputFormat Class
            job.setOutputFormatClass(TextOutputFormat.class);    //Set the OutputFormat Class

            FileInputFormat.addInputPath(job, in);            //Specify the InputPath to the Job
            FileOutputFormat.setOutputPath(job, out);        //Specify the OutputPath to the Job

            job.setJarByClass(WordCountApp.class);             //set the JobControl class name in the JAR file
            job.setJobName("WordCount");                     //set a name for you job
i
            job.submit();                                     //submit your job to Hadoop for execution


        }
}
Run the Job
Now let’s run this application:
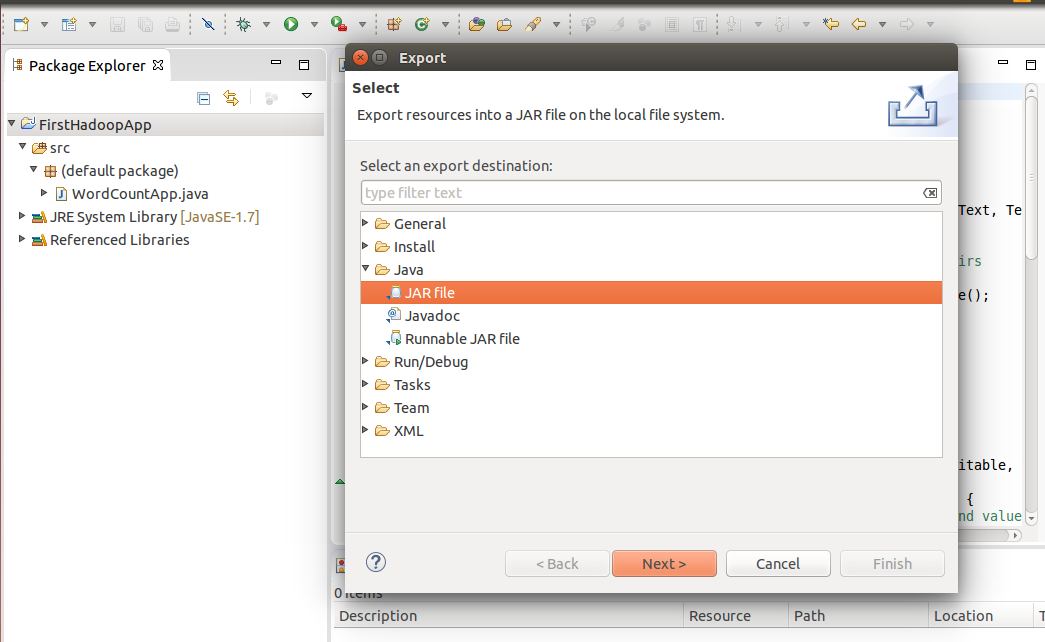
Hadoop needs the full compiled java classes in a JAR file to run. So that should be the first step. We can create the standard Java JAR file in Eclipse using the option: File -> Export -> Java -> JAR file. You can take help from the screenshots given below:
Make sure that classes are included –
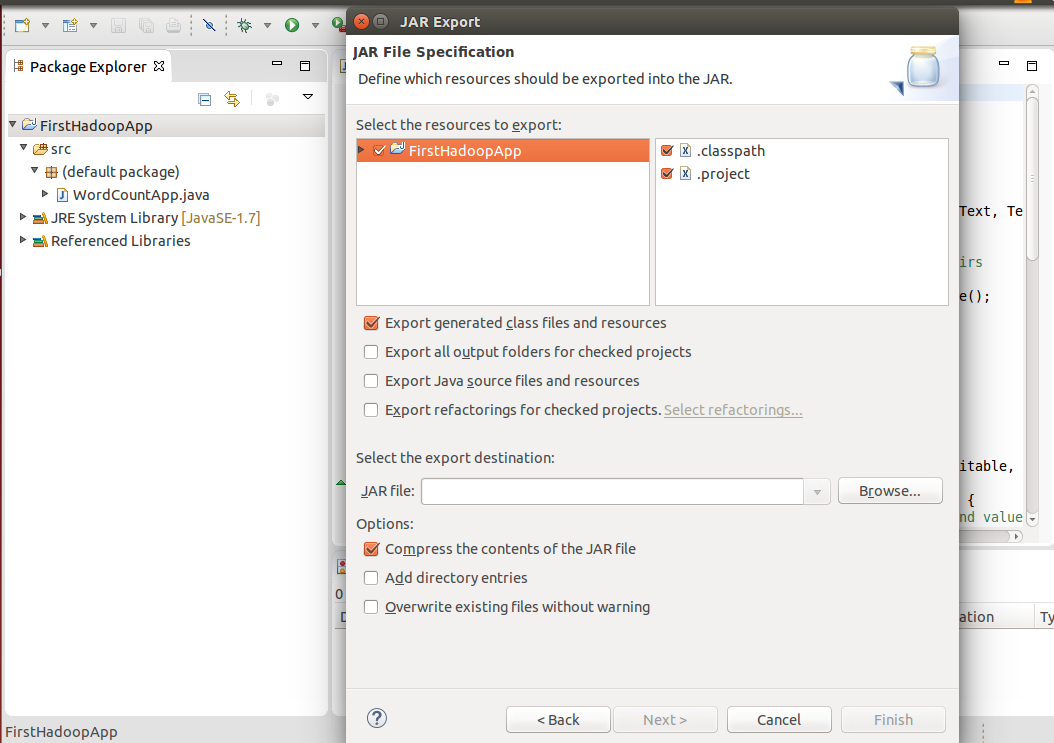
Browse the location to save -> Give it a name as “WordCountApp.jar”

We can run a MapReduce job from the command line with:
$ hadoop jar FileName.jar MainMethodClassName arguments
The first word of the command “hadoop” specifies that we are going to call a Hadoop program, the second word “jar” specifies that we are going to run a jar file, the third word is the name of the class which contains public static void main() method and the last word specifies the arguments passing to the Hadoop job which is generally input to the job and output from the job.
We can run a Hadoop job in two modes: Standalone Mode and Pseudo Distributed/ Fully Distributed Mode.
- Standalone Mode Execution:Start the Hadoop in standalone mode and then run the app using the command line as given below:
$ hadoop jar WordCountApp.jar WordCountApp demofile.txt output
After the successful execution you will see the message “reduce task executor complete” on the console like the screenshot given below:

let see the output: in the output repository, you will see two files: part-r-00000 and _SUCCESS. Here the success file indicates your job executed successfully and the part-r-00000 contains the actual output like the screenshot given below:

- Pseudo Distributed Mode/Fully Distributed Mode Execution:
- Start the Hadoop in pseudo-distributed mode and check for all the daemons:
$ jpsthis command shoud show the following Hadoop daemons are running:
NodeManager
JobHistoryServer
NameNode
DataNode
ResourceManager
- Put the input file to HDFS
$ hdfs -dfs put demofile.txt - Run the job using the same command as we used in standalone mode:
$ hadoop jar WordCountApp.jar WordCountApp demofile.txt output - After the successful execution, the output would be saved in HDFS. You can explore the output using:
$ hdfs dfs -cat output/part*The output would as similar as we have seen earlier after the execution in Local Mode.
- Explore the status of applications using browser use: localhost:8088
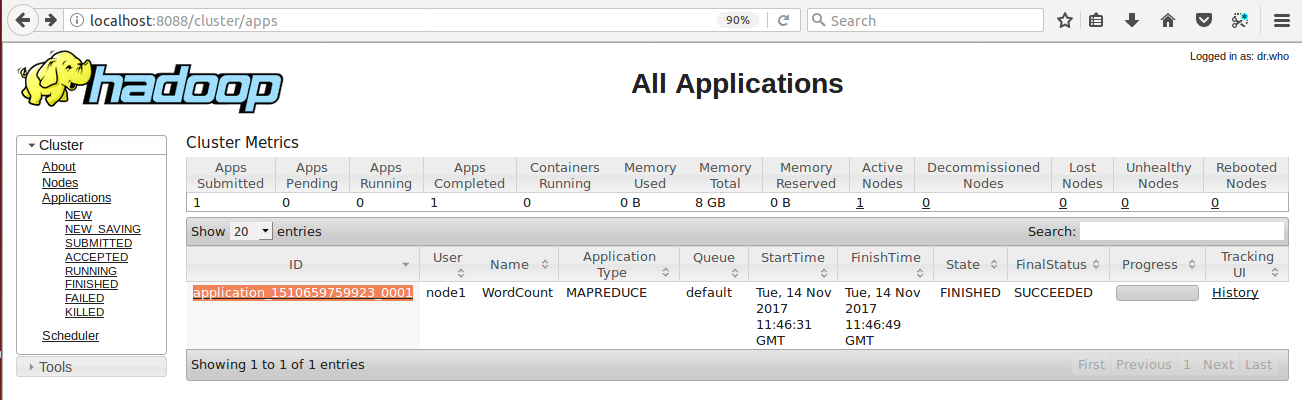
Here you can get the pieces of information like: Application ID, User, Name of your Application( that we have set in the job configuration parameter as “job.setJobName(“WordCount”);”), Application Type, Start Time, Finish Time, State, Final Status, Progress and History.
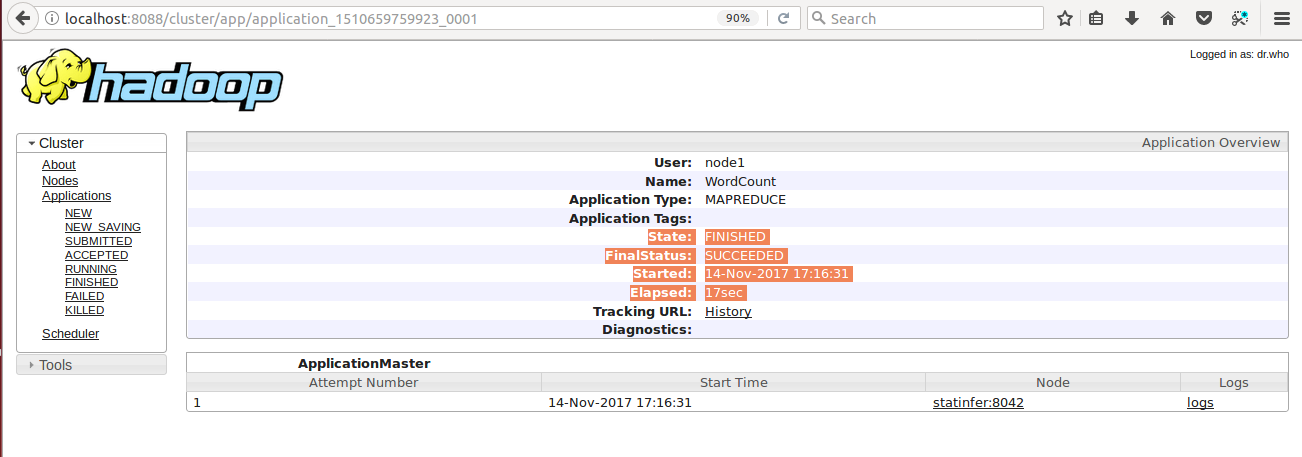
- When you hit the Application ID: application_1510659759923_0001, you will get the more precise information like how much time your application took to finish.
- Start the Hadoop in pseudo-distributed mode and check for all the daemons: